Monday, 1 April 2019

Creating the frogger game in less of 10 minutes

I'll show how to create a Frogger game in livecode in less of 10 minutes.
Frogger is a very old game, where a frog try tro cross a highway trying to avoid cars.
This guid will create a very simple version, but it will cover many topics of game programming... and in less of 10 minutes!
Are you ready? GO!
Create a new Mainstack, this is the window of our game.
Put inside the window these elements:
  • Start button
  • a green circle, named frog
  • a pink rectangle named car1. 
  • a big dark green rectangle namer arrival.
  • put the arrival label on the dark rectangle
 This should be the result:

Now in the card put his code, it's the code to move the frog with arrow keyboard:

on arrowkey puls
   if the giostat of me is "attivo" then
      switch puls
         case "up"
            move graphic "frog" relative 0,-30         
            break         
         case "down"
            move graphic "frog" relative 0,30         
            break
         case "left"
            move graphic "frog" relative -30,0
            break               
         case "right"
            move graphic "frog" relative 30,0
            break         
      end switch
      if intersect(graphic "frog",graphic "arrival") then
         set the giostat of this card to "stopped"
         answer "You win!"
      end if      
   end if
end arrowkey


This is half of the work, now we have to work with cars.
If the window lwidht is 400 pixels, then this is the code to put inside the car, it will set the starting poit, move from left to right and gagain put it on the left of the screen (on and on until the game end):

on iniziagioco
   set the percorso of me to true
   controint
   gioco
end iniziagioco

on moveStopped
   put the percorso of me into temp
   set the percorso of me to not temp
   if the giostat of this card is "attivo" then
      send gioco to me in 0.1 millisec
   end if   
end moveStopped

on gioco   
   put the percorso of me into temp
   if temp then
      move me relative 400,0 in 3 sec without waiting
      else
         move me relative -400,0 in 1 millisec without waiting
      end if
end gioco

on controint
   if intersect(graphic "frog", me) then
      set the giostat of this card to "stopped"
      stop moving me         
      answer "Aaaaah! The frog died!"
   end if   
   if the giostat of this card is "attivo" then
      send controint to me in 0.1 sec
   end if      
end controint


Let's explain the code.
Iniziagioco is the message to start the game, once activate the car will move from left to righ for 400 pixels. Reached the end of the screen will teleport a the left and start again. This loop will continue until the custom property giostat will become "stopped". Custom property are very handy because are easy to inspect and the can be seen everywhere in program.
Controint is a loop message, cycled every 0.1 seconds, to chech if the car is under a car.
The messages gioco and movestopped are to move the car. We want to put 6 cars, so we use the move without waiting form, this way all cars move independently. MoveStopped is automatically launched by livecode when a grapic stop to move.
Now copy and paste the car 5 times, this way we have 6 cars on the screen. Change the name to car2, car3, car4, car5 and car6. Change the size of the cars as you like. Now in the code of the last 3 cars change the 400 in -400 and viceversa, so these cars will move from right to left.
The final result will be like this:


And now this iis the code of the start button:

on mouseUp
   set the loc of graphic "frog" to 200,300
   set the giostat of this card to "attivo"
   repeat with i=1 to 3
      set the left of graphic ("car" & i) to the left of this card
   end repeat
   repeat with i=4 to 6
      set the right of graphic ("car" & i) to the right of this card
   end repeat
   repeat with i=1 to 6
      send "iniziagioco" to graphic ("car" & i)
   end repeat
end mouseUp


FINISHED! Less of 10 minutes!
As you can see the start button to the work to correct position the carsm of the frog and it send starting signal at the cars.
This is a very simple example, but you can improve it these ways:
  • substitute livecode graphic with images or animations
  • changing speeds or random speed of cars, valuing cars dimensions
  • random cars
  • move works on any curve, you can create random or complex highways
  • you can add timer and scores
Free to post comments

Sunday, 31 March 2019

The Hangman game

You can download this game from  http://livecodeshare.runrev.com/download/stack/69/Hangman, it's the classic Hangman game:
It's a nice example of:
  • Custom graphic for buttons
  • Custom top bar
  • Custom shape windows (see the bottom window corners)
  • Windows slowly disappearing
Play with it and then I suggest you to study the code.

Saturday, 30 March 2019

Working with ZIP files

Livecode has the ZIP libraries integrated, so you can work with zip files.
In order to compress files or folder you have to use the absolute path of the new archive, example:

revZipOpenArchive "C:/myarchive.zip", "write"


Now you can add files and folders, just indicate the absolute paths inside the archive. You specify just files one by one, and directories are created by the path used, this is the code:

revZipAddItemWithFile "C:/myarchive.zip", "test.txt", "C:/Programs/RunRev/test.txt"
revZipAddItemWithFile "C:/myarchive.zip", "folder1/test.txt", "C:/Programs/RunRev/test.txt"
revZipAddItemWithFile "C:/myarchive.zip", "temp/folder2/test.txt", "C:/Programs/RunRev/test.txt"


After adding files, you have to close the archive, only at this point the ZIP file is correctly created:

revZipCloseArchive "C:/myarchive.zip"


In order to unzip files, first you have to get the list of files and folders, then you have to create all the folders needed on the destination filesystem, finally you can decompress files. For example, this is the code to do it on Windows:

on mouseUp
   answer file "Select Zip file to decommpress:"
   put it into myzip
   revZipOpenArchive myzip,"read"
   put revZipEnumerateItems(myzip) into tItems
   repeat for each line tline in tItems
      if last char of tline is "/" then
         create folder "C:/Documents and Settings/max/Desktop/" & tline
      else         
         put "C:/Documents and Settings/max/Desktop/" & tline into temp
         revZipExtractItemToFile myzip, tline, temp
      end if
   end repeat
   revZipCloseArchive myzip
end mouseUp

You can modify the above code for your needs.

Saturday, 23 March 2019

Changing window shape

If you want a custom window shape, like this:

instead of this:

You have to import the image backgroud, this image must have transparent parst like a GIF or a PNG.
Then you have to set the windowshape of the stack to the imported image, using the property inspector. Finished.
Unfortunately you have no more the icons to iconify or close the window, ho you have to add these buttons:


Now add the following code in the close button:
on MouseUp
   quit
end MouseUp

and this code in the iconify button:
on mouseUp
   set the iconic of this stack to true
end mouseUp

Now add this code in the stack to move it:
on mouseStillDown   
   set the loc of this stack to globalloc(the mouseLoc)
end mouseStillDown
   

Friday, 15 March 2019

Toggle button

One of the missing controls in Livecode palette is the toggle button.
To obtain a toggle button, just add this code to a button:


on MouseUp
   put the hilite2 of me into hitemp
   if hiTemp then
      set the hilite2 of me to false
   else
      set the hilite2 of me to true
   end if
end MouseUp

setprop hilite2 temp
   set the hilite of me to temp
   set the hilite2 of me to temp
end hilite2

I used a new property, because the hilite is actived as soon you press but you still don't relase the mouse.

Thursday, 14 March 2019

Animation with drawing

You can create an animation with the drawing commands of livecode, for example see this script:

on mouseUp
   set the rect of the templateImage to 100,100,400,400
   create image "test"
   choose brush tool
   set the brush to 8
   set the brushColor to red -- could use an RGB triplet here
   set the dragSpeed to 20 -- very slow
   #H
   drag from 120,120 to 120,300
   drag from 120,200 to 150,200
   drag from 150,300 to 150,120
   #i
   drag from 180,120 to 180,150
   drag from 180,180 to 180,300     
end mouseUp

this is the result:

The example is simple, but you can use all geometric shapes of livecode, so you can create very complex animations.

Friday, 22 February 2019

Expandable animated menus

I needed a LOT of time to write this post, this time I'll show you how to create animated menu collapsing/expanding.
You are free to change anything of the code and animations.
You can change buttons in the examples below with any combinations of items you like for graphic.
It's a little complex, so I'll write a plugin to do this automatically and better.
The final result will be like this demo:
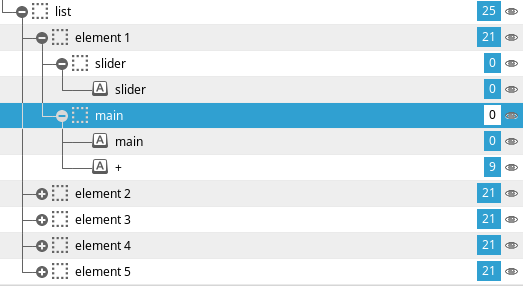
Please note the will need to do a lot of GROUPS. Here is the hierarchy of what we'll see, keep it in mind for the rest of this post:
First of all, create a button called main, then another button called +. Resize them to get this result:
Now put this code in button + script:

on mouseUp
   if the label of me is "+" then
      showMe
      set the label of me to "-"
   else
      hideMe
      set the label of me to "+"
   end if
end mouseUp


Group them together and call the group Main.
Create another button call it slider, resize it below Main like this:

Now group slider with itself (or other item you like in slider), and call the group Slider.
Now group group slider with group main, call this group element 1.
Set the lockLocation of group "element 1" to true.
Put this code in group element 1:

on showMe
   repeat while the top of group "Slider" of me < the bottom of group "Main" me - 4
      lock screen
      set the bottom of group "Slider" of me to the bottom of group "Slider" me + 4
      set the height of me to the height of me + 4
      layoutChanged the short name of me, 4
      unlock screen
      wait 10 milliseconds with messages
   end repeat
end showMe

on hideMe
   repeat while the bottom of group "Slider" of me > the bottom of group "Main" of me
      lock screen
      set the bottom of group "Slider" of me to the bottom of group "Slider" of me - 4
      set the height of me to the height of me - 4
      layoutChanged the short name of me, -4
      unlock screen
      wait 10 milliseconds with messages
   end repeat
end hideMe


Clone it has many times you like, for example 5 times.
Put any clone below the preceding clone, change the numbers in names, so we have: element 1 on top, element 2 down element 1, element 3 down element 2 and so on.
Group all and call it List.
Set the lockLocation of group "list" to true.
Put this code in group list script:

on layoutChanged pGroup, pSize
   lock messages
   
   local tElementCount
   
   if pGroup is "Element Template" then exit layoutChanged
   
   put word 2 of pGroup into tElementCount
   add 1 to tElementCount -- look for the next one
   repeat while there is a group ("Element" && tElementCount)   
      set the top of group ("Element" && tElementCount) to the top of group ("ElemenT" && tElementCount) + pSize--
      add 1 to tElementCount
   end repeat
   set the vscroll of me to the vscroll of me
   
   if the bottom of group pGroup of me > the bottom of me then
      set the scroll of me to the scroll of me + pSize
   end if
   set the vScrollBar of group "List" to the formattedHeight of group "List" > the height of group "List"
   set the vScroll of group "List" to the vScroll of group "List"
   unlock messages
end layoutChanged


FINISHED!!!